In every Voltron television program to date — Voltron: Defender of the Universe, Voltron: The Third Dimension, Voltron Force, and Voltron: Legendary Defender — the Castle of Lions has been the home and base of operations of the Voltron Lions’ pilots and their closest allies. In a crisis, each Lion’s pilot often needs to make a quick exit from the Castle’s control room to his or her Lion.
In this article, we’ll take a closer look at Voltron: Legendary Defender to see how the Lions’ pilots, or paladins, move from the Castle’s control room or bridge to the Lions’ hangars.
This article goes reeeeeeeeeeeally deep. Writing stuff like this is one of many ways that I celebrate Voltron: Legendary Defender and everyone who brings this great program to life.
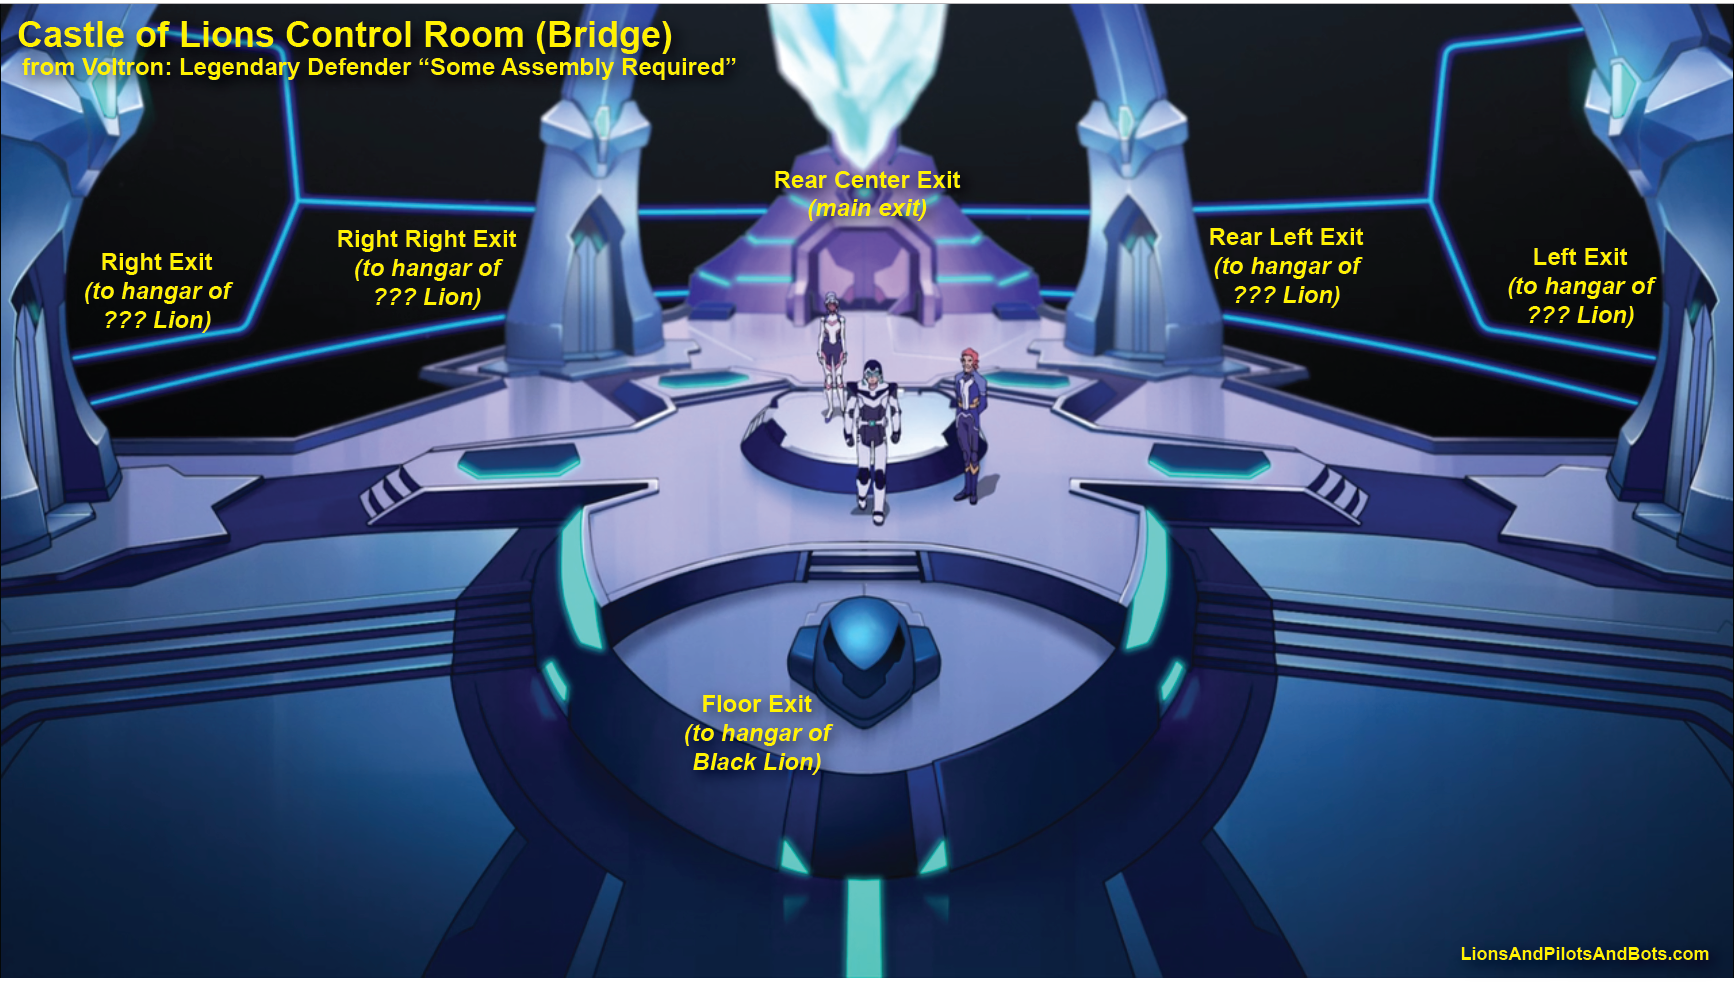
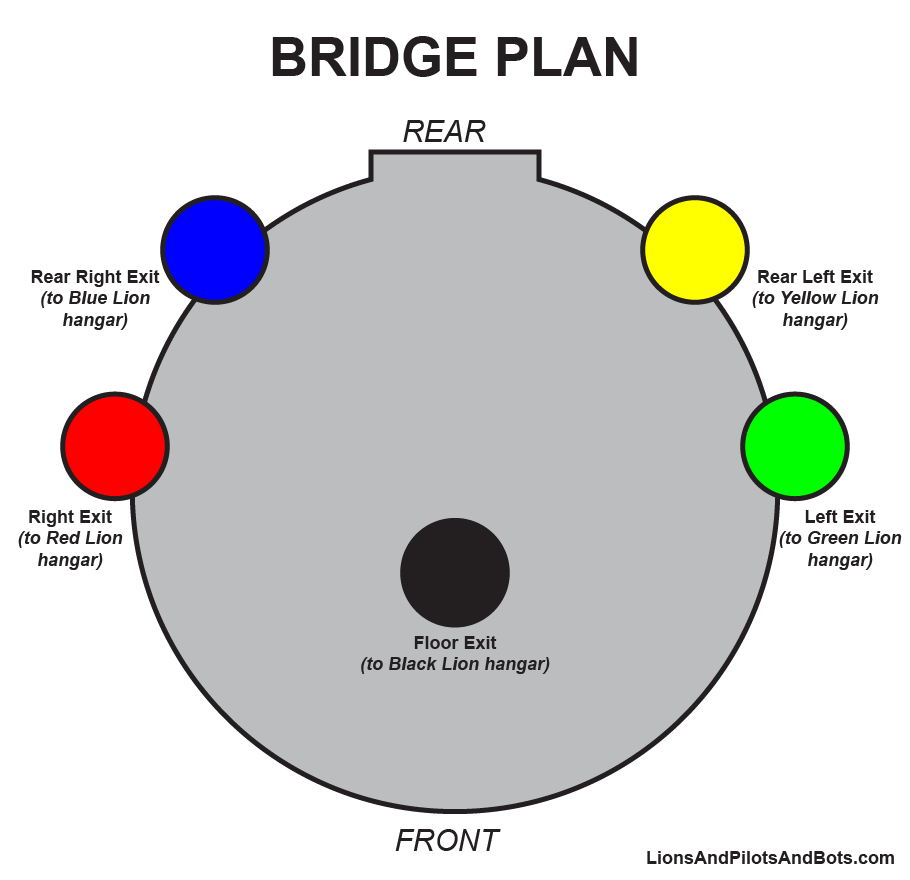
Our first stop is the bridge. Around its periphery, the bridge has six known exits:
- Rear Center Exit: This is the main exit. It leads from the Bridge to basically anywhere else within the Castle.
- Floor Exit: This exit is located along the centerline of the room, in front of Princess Allura’s usual work area, and behind Coran’s usual work area. This exit leads to the hangar of Black Lion, as we’ll see shortly.
- Left Exit: This exit leads to the hangar of one of the non-black Lions.
- Right Exit: This exit leads to the hangar of one of the non-black Lions.
- Rear Right Exit: This exit leads to the hangar of one of the non-black Lions.
- Rear Left Exit: This exit leads to the hangar of one of the non-black Lions.
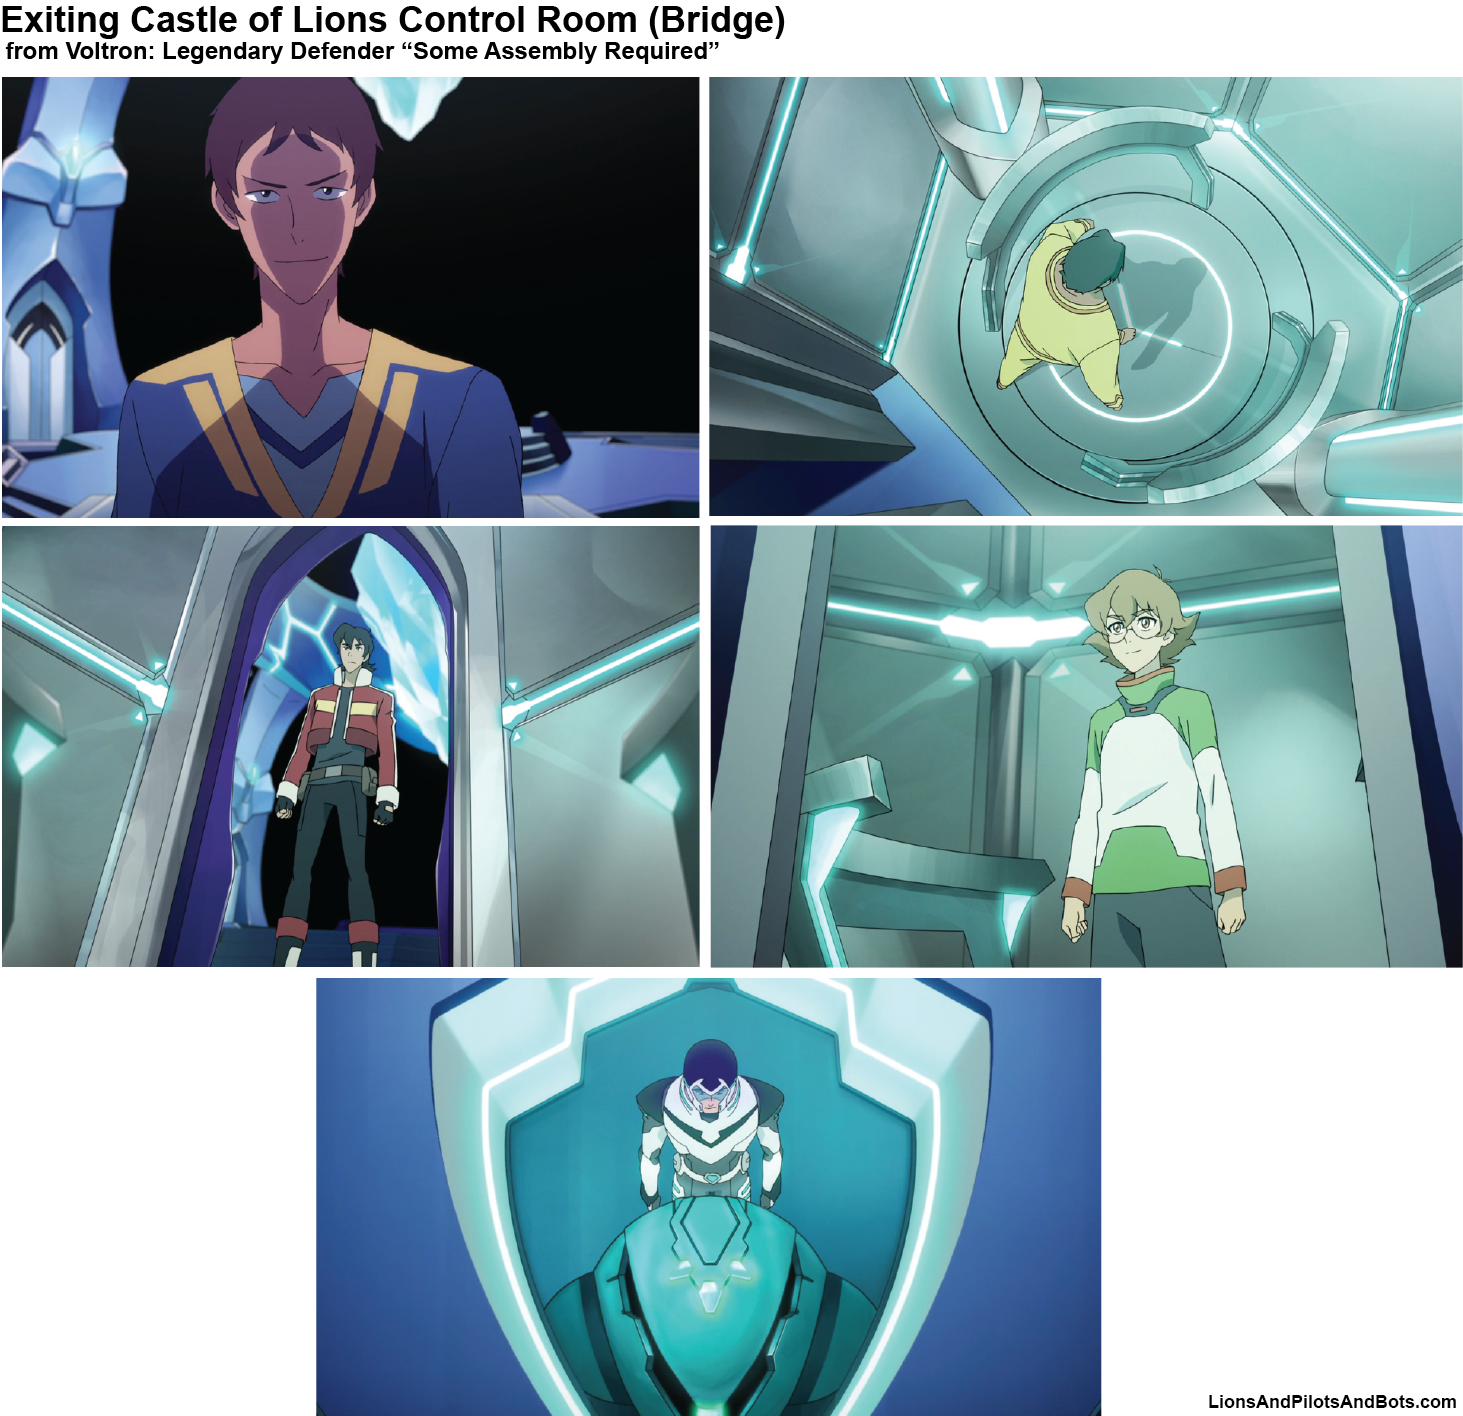
In “Some Assembly Required,” we see the paladins exit the Castle’s bridge and travel to the hangars of all five Lions…twice. Unfortunately, the only exit that is easily associated with a single Lion is the Floor Exit, which Shiro uses to travel to the hangar of Black Lion, as shown below.

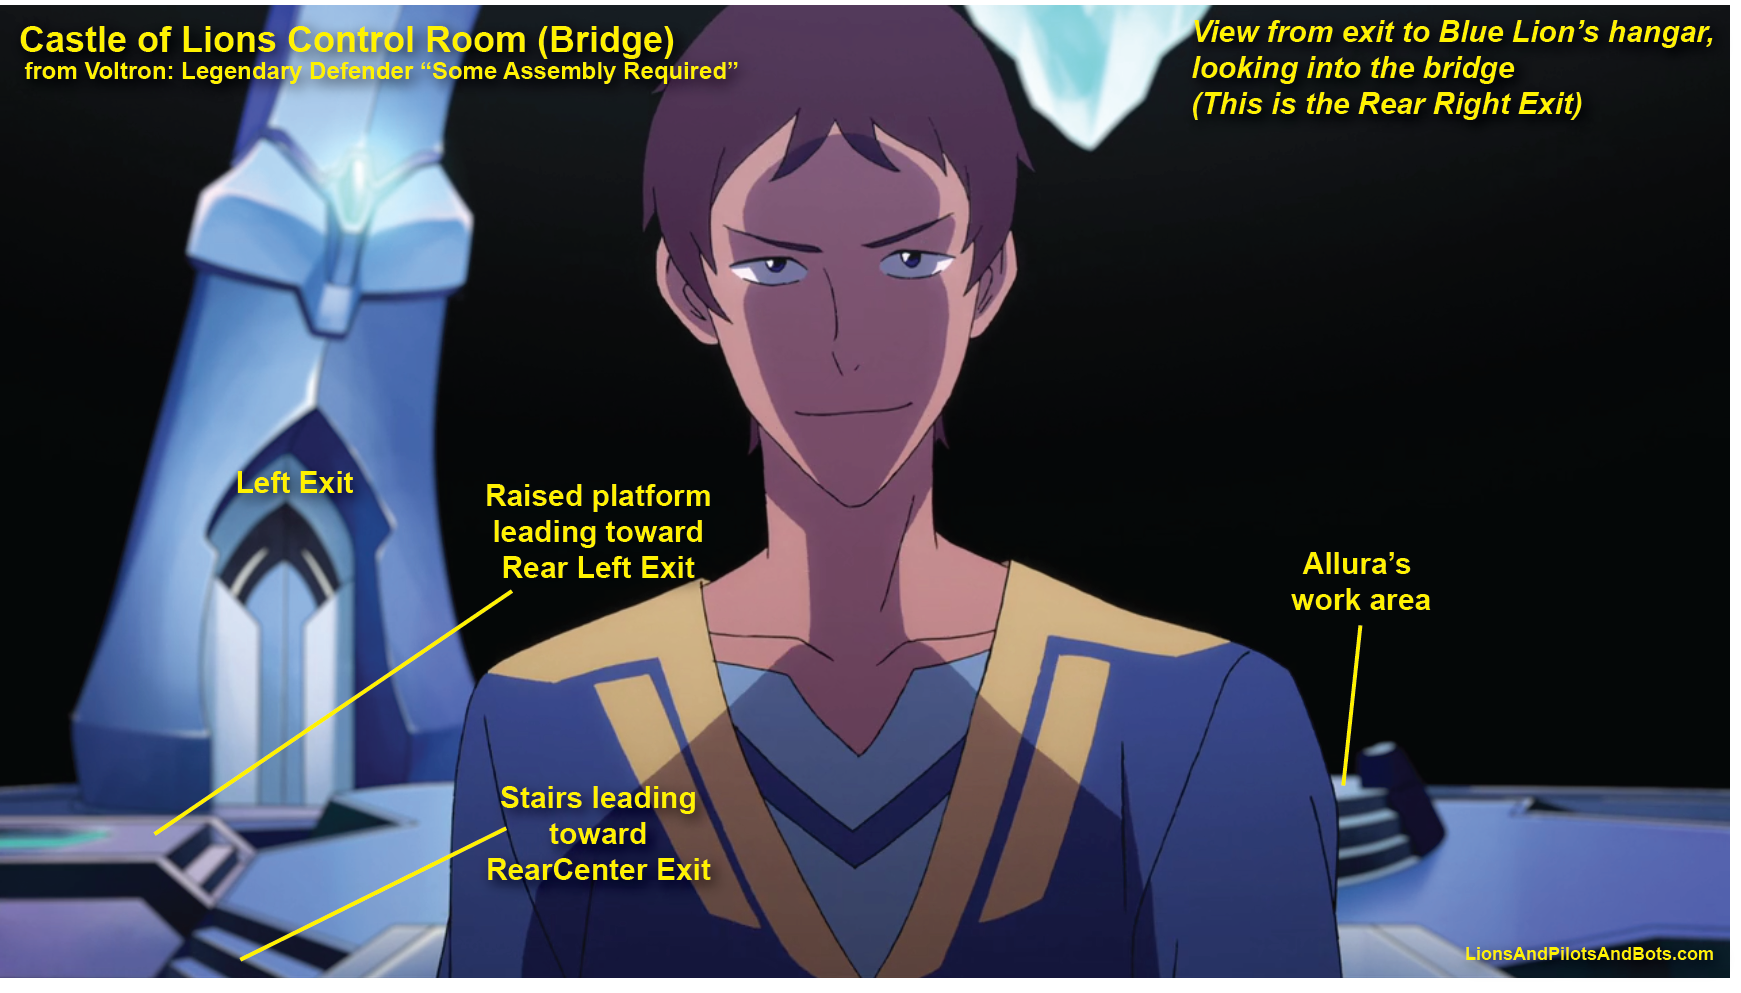
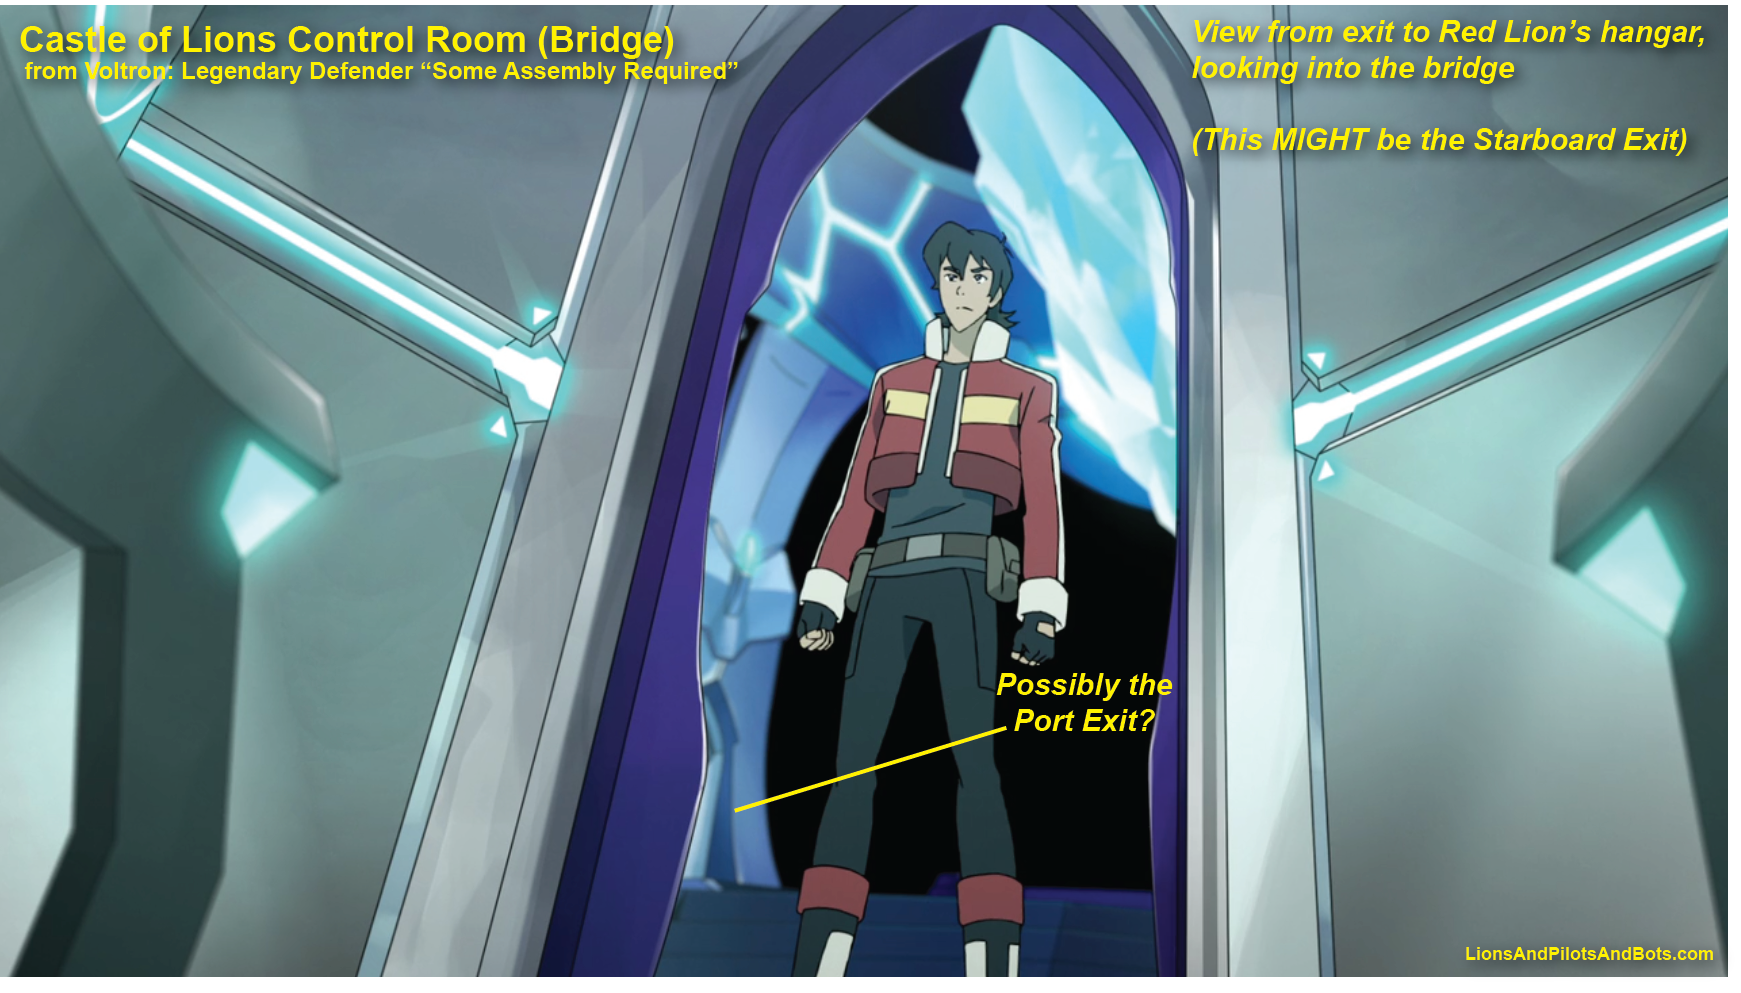
In “Some Assembly Required,” we see shots from outside two bridge exits, looking into the bridge.
One “outside looking in” shot is from outside the exit to Blue Lion’s hangar, looking into the bridge. Lance dominates the image, but we can see enough features of the bridge to identify which bridge exit he’s using: it’s the Rear Right Exit.
The other “outside looking in” shot is from outside the exit to Red Lion’s hangar, looking into the bridge. We see far less of the bridge in this shot, but we can see one exit that is more or less straight across the bridge from the exit to Red Lion’s hangar. Based on the perspective of the exit across the bridge, that exit might be the Left Exit, which would make the exit to Red Lion’s hangar the Right Exit. This isn’t a 100% sure thing, but it’s a reasonable guess.
If the exit to Blue Lion’s hangar is the Rear Right Exit, and the exit to Red Lion’s hangar is the Right Exit, then based purely on symmetry, the exit to the other “leg lion” – Yellow Lion – would be the Aft Left Exit, and the exit to the other “arm lion” – Green Lion – would be the Left Exit.
To summarize, it appears that:
- The Floor Exit leads to Black Lion’s hangar.
- The Left Exit might lead to Green Lion’s hangar.
- The Right Exit might lead to Red Lion’s hangar.
- The Rear Left Exit might lead to Yellow Lion’s hangar.
- The Rear Right Exit leads to Blue Lion’s hangar.
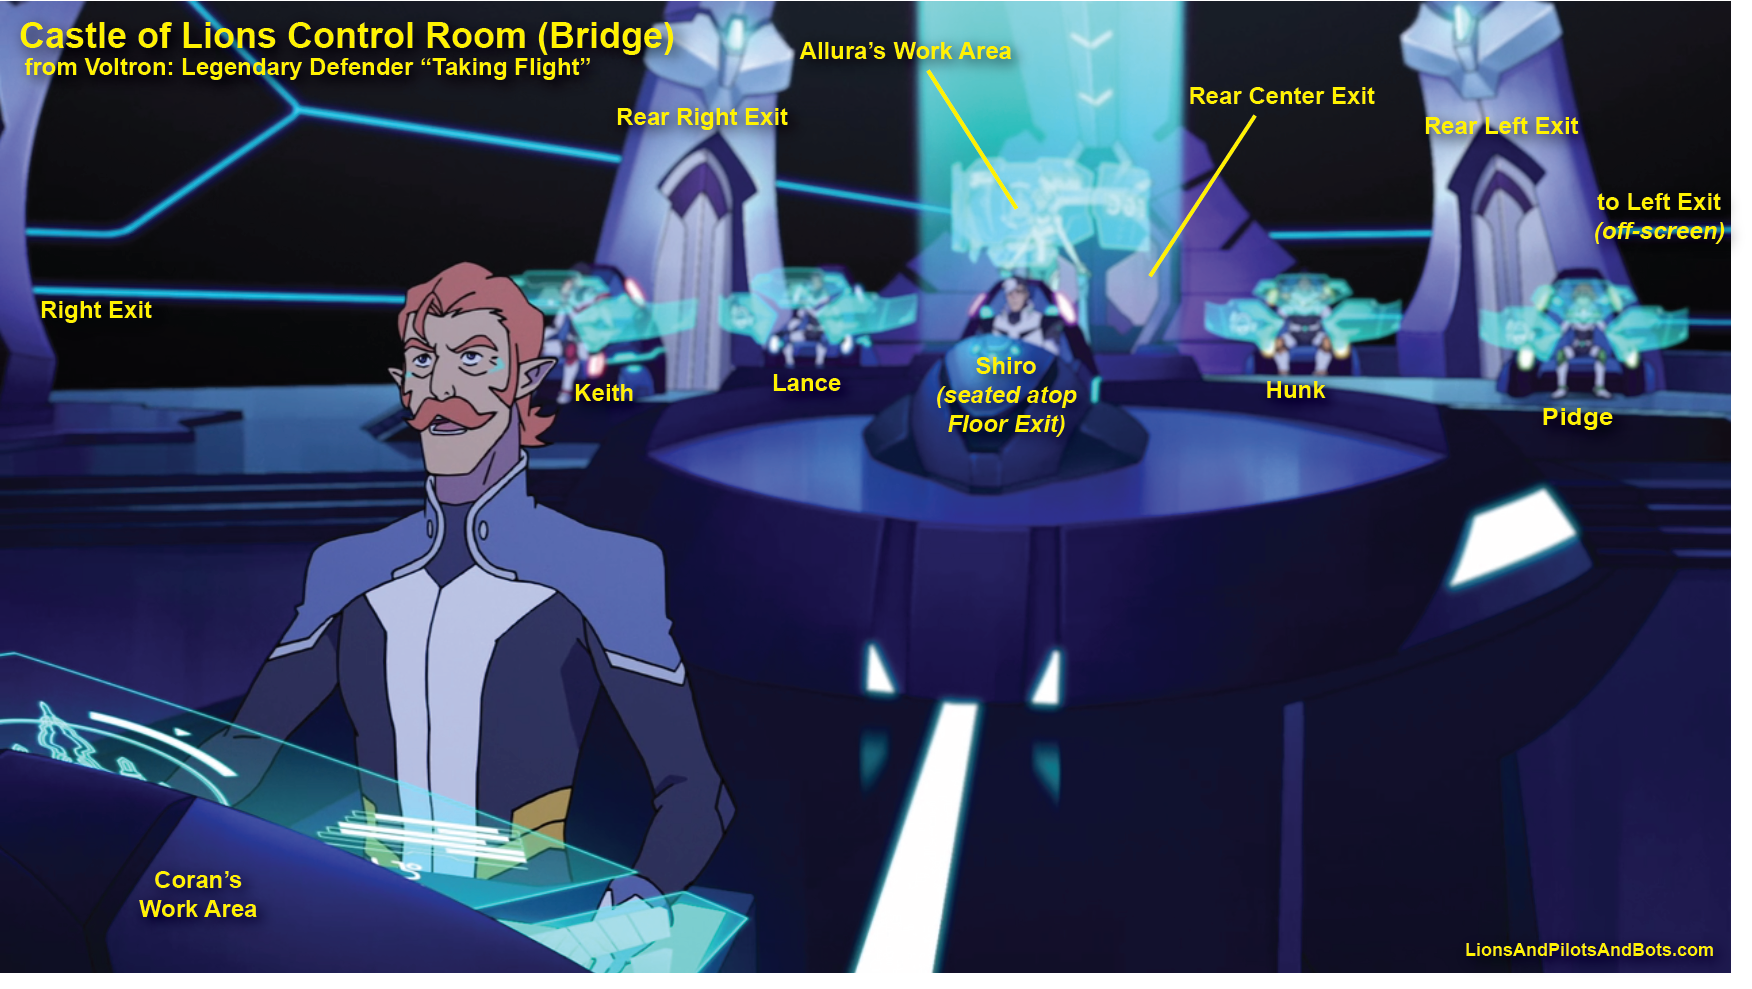
“Taking Flight” and “Eye of the Storm” seem to add weight to our guesses. In these episode, we see the paladins on the bridge, seated at workstations that have appeared from beneath the floor.
- Shiro sits at a console that’s built in to the Floor Exit.
- Lance is seated at a console that’s positioned along the path from Allura’s work area to the Rear Right Exit, which we’ve previously determined to be the exit to Blue Lion’s hangar.
- Keith’s console is positioned along the path from Allura’s area to the Right Exit, which we’ve guessed is the exit to Red Lion’s hangar.
- Hunk’s console is on the path from Allura’s area to the Rear Left Exit, which we’ve guessed is the exit to Yellow Lion’s hangar.
- Pidge is at a console on the path from Allura’s area to the Left Exit, which we’ve guessed is the exit to Green Lion’s hangar.

The very crude “bridge plan” diagram below shows the positions of the five Lion hangar exits.
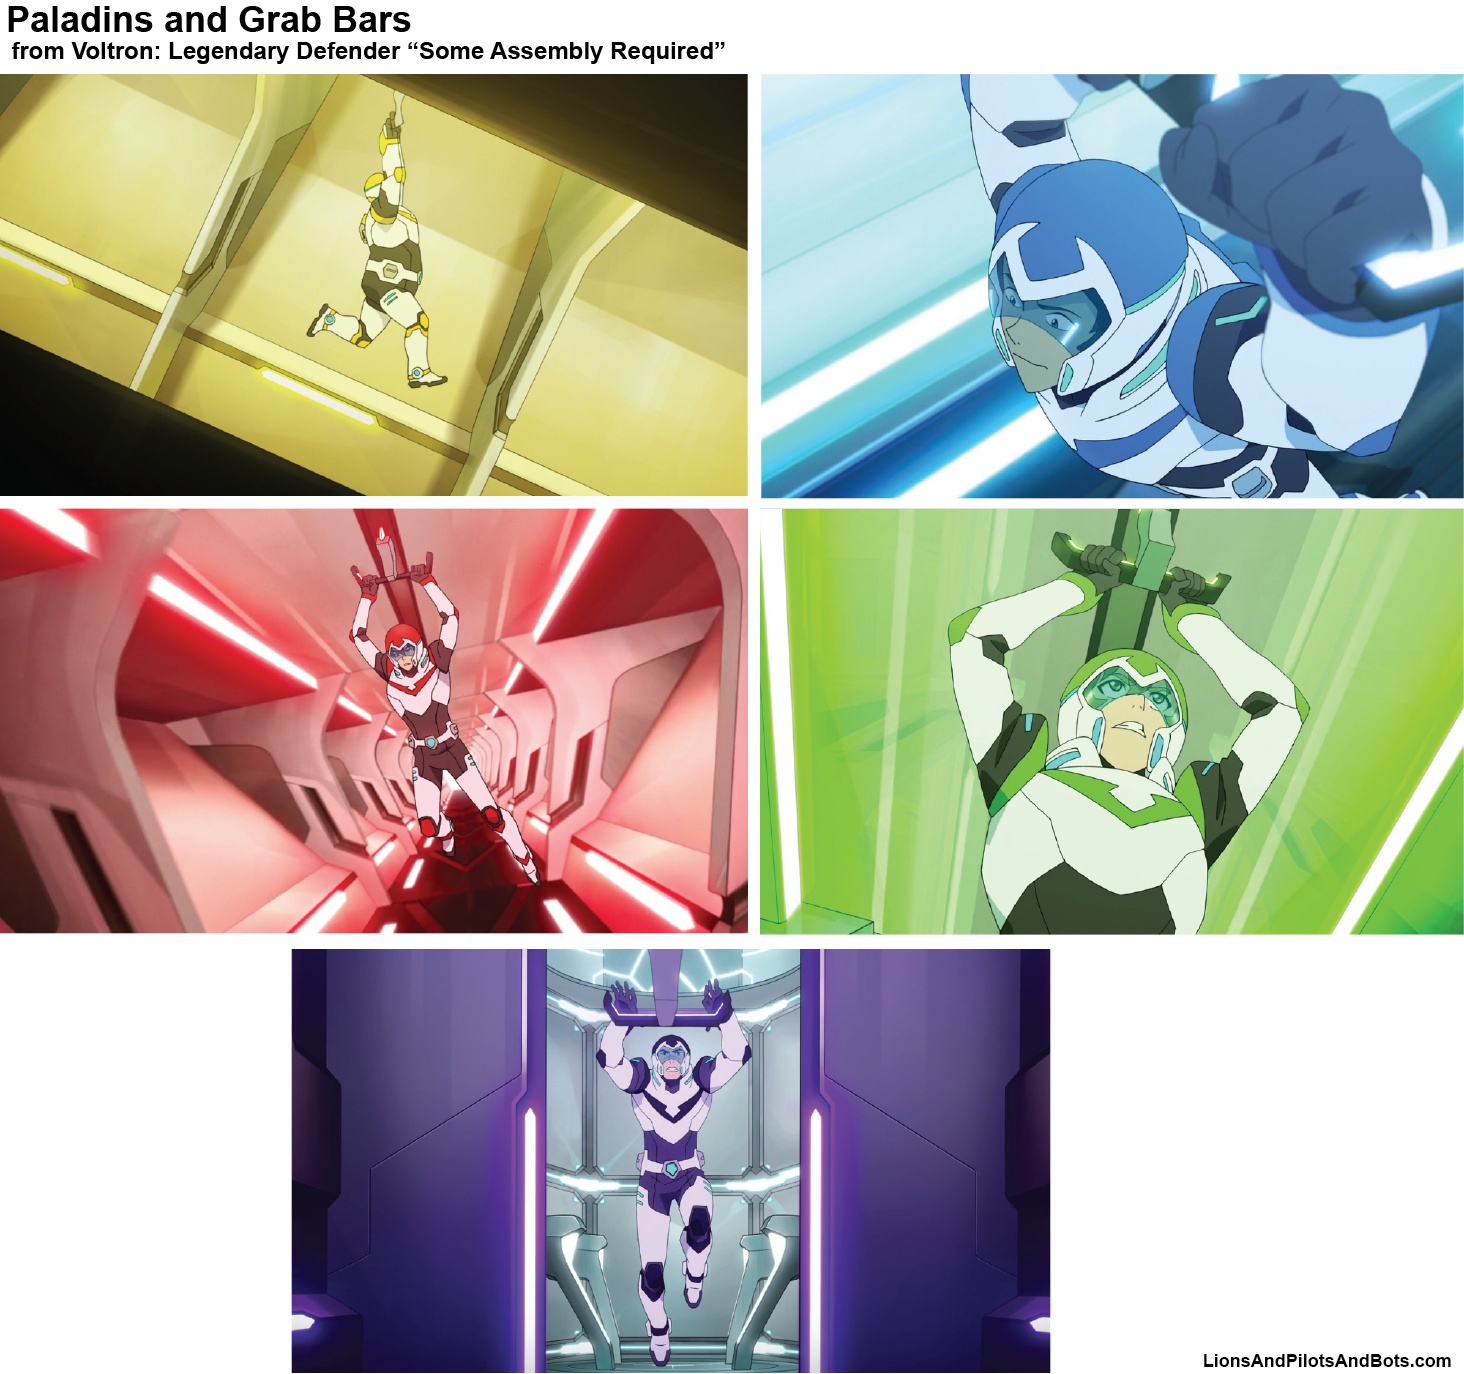
Each exit leads to a platform that descends like an elevator in a cylindrical shaft.
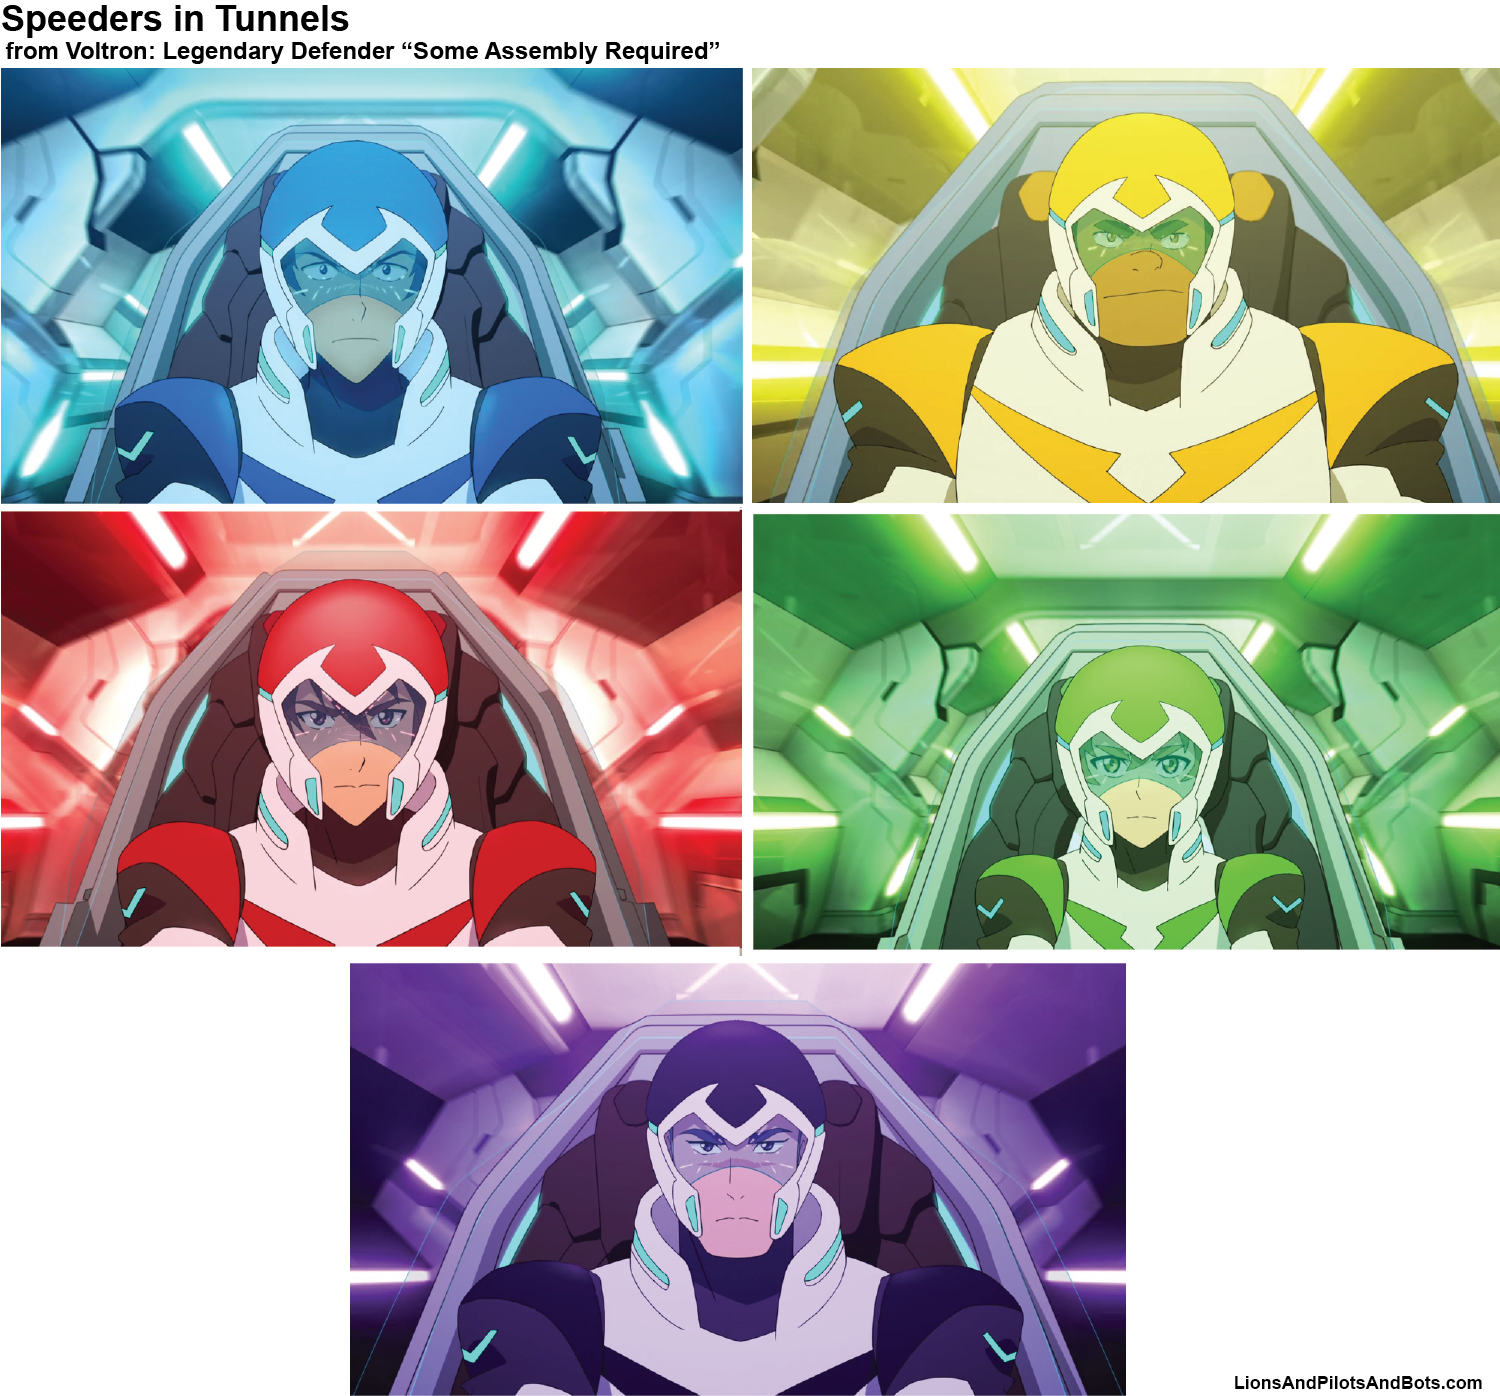
Once the platform reaches the bottom of the shaft, the paladin steps forward, holds onto a grab bar, and rides with the grab bar as it proceeds along what appears to be a long, straight-line tunnel that slopes downward.
At end of this tunnel, the paladin lets go of the grab bar and drops feet first through another tunnel.
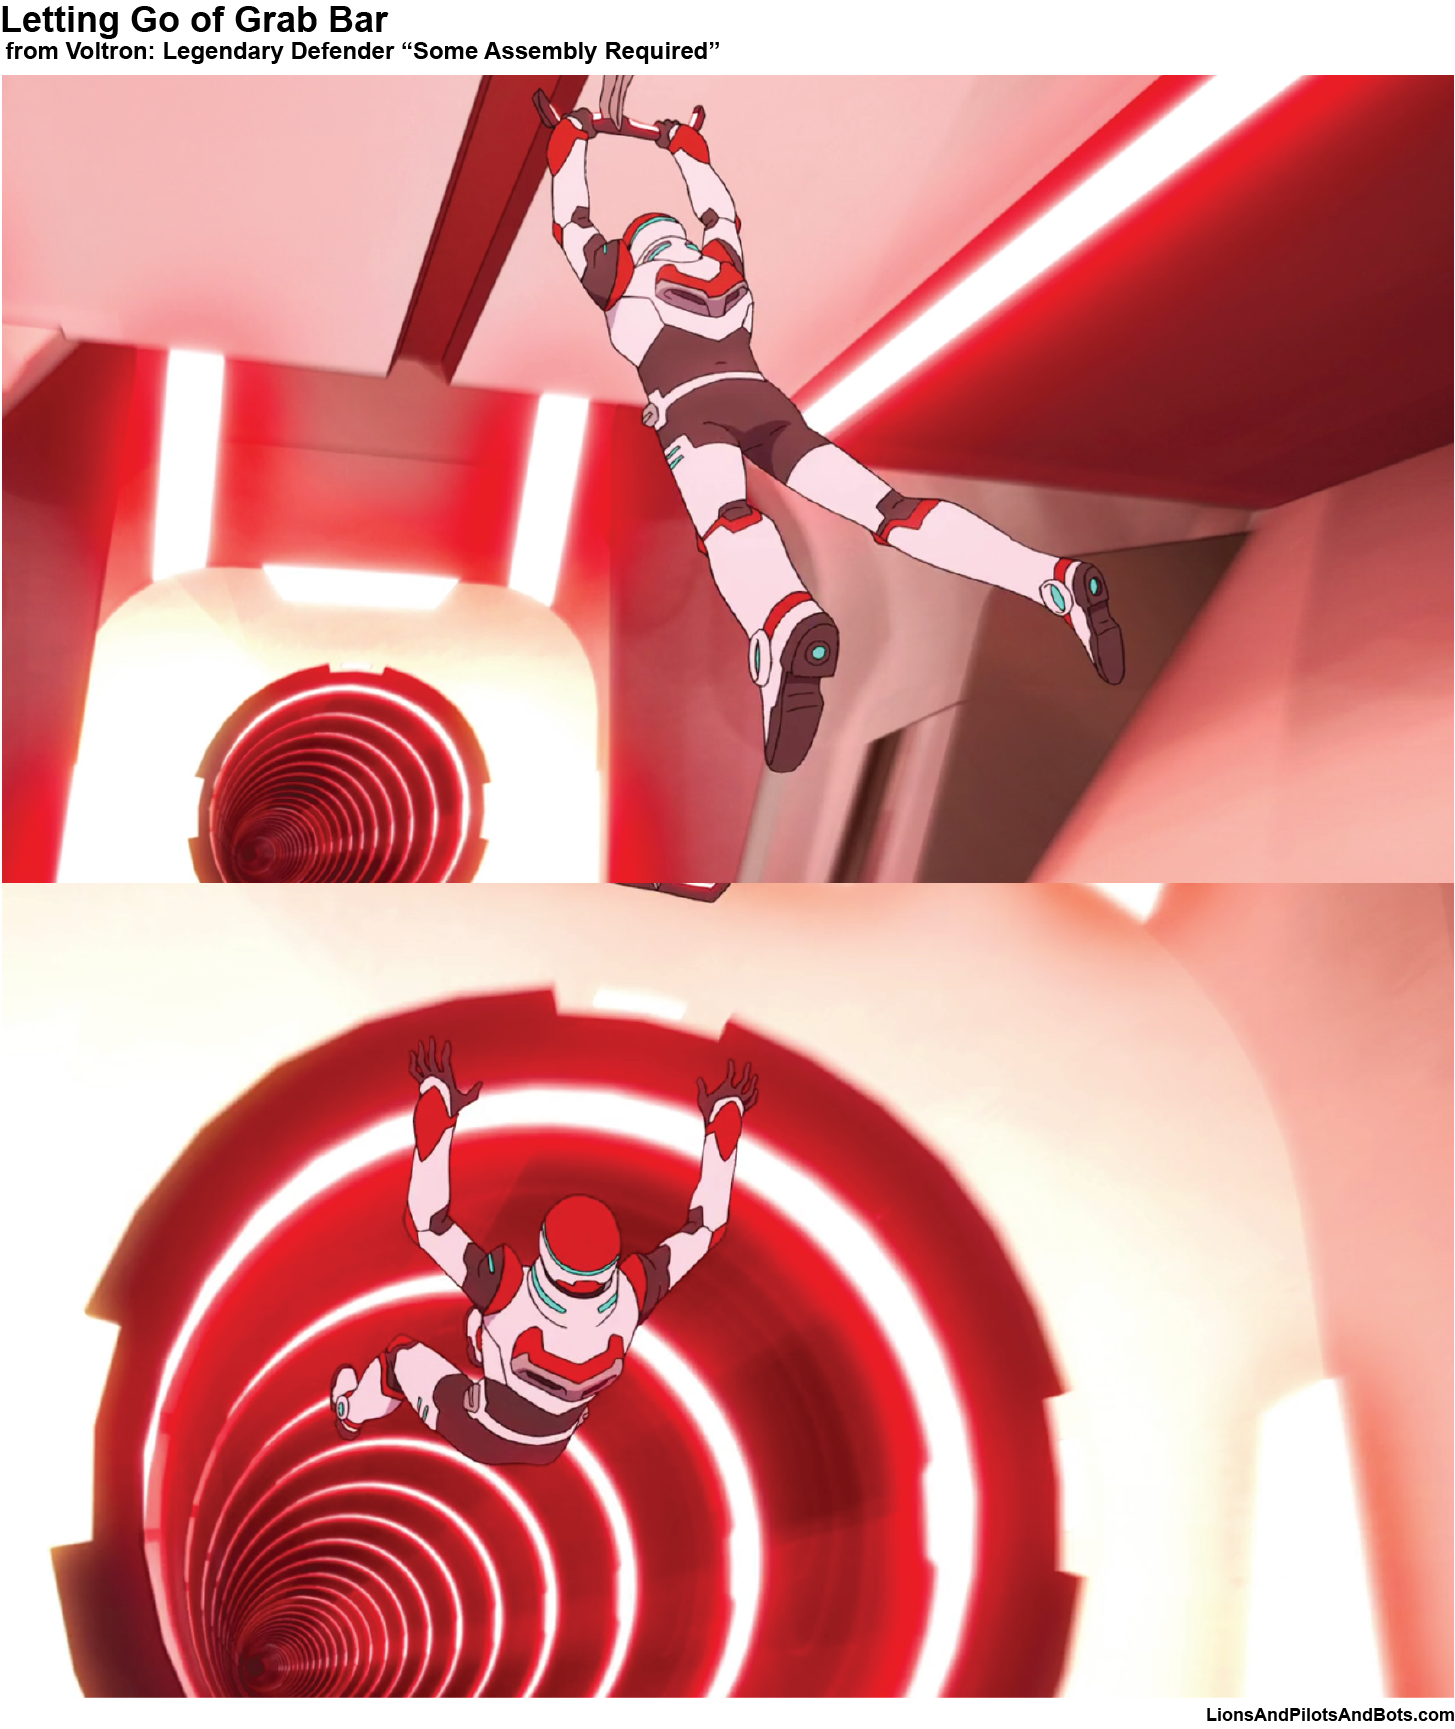
At the end of this tunnel, the paladin drops into his or her speeder.
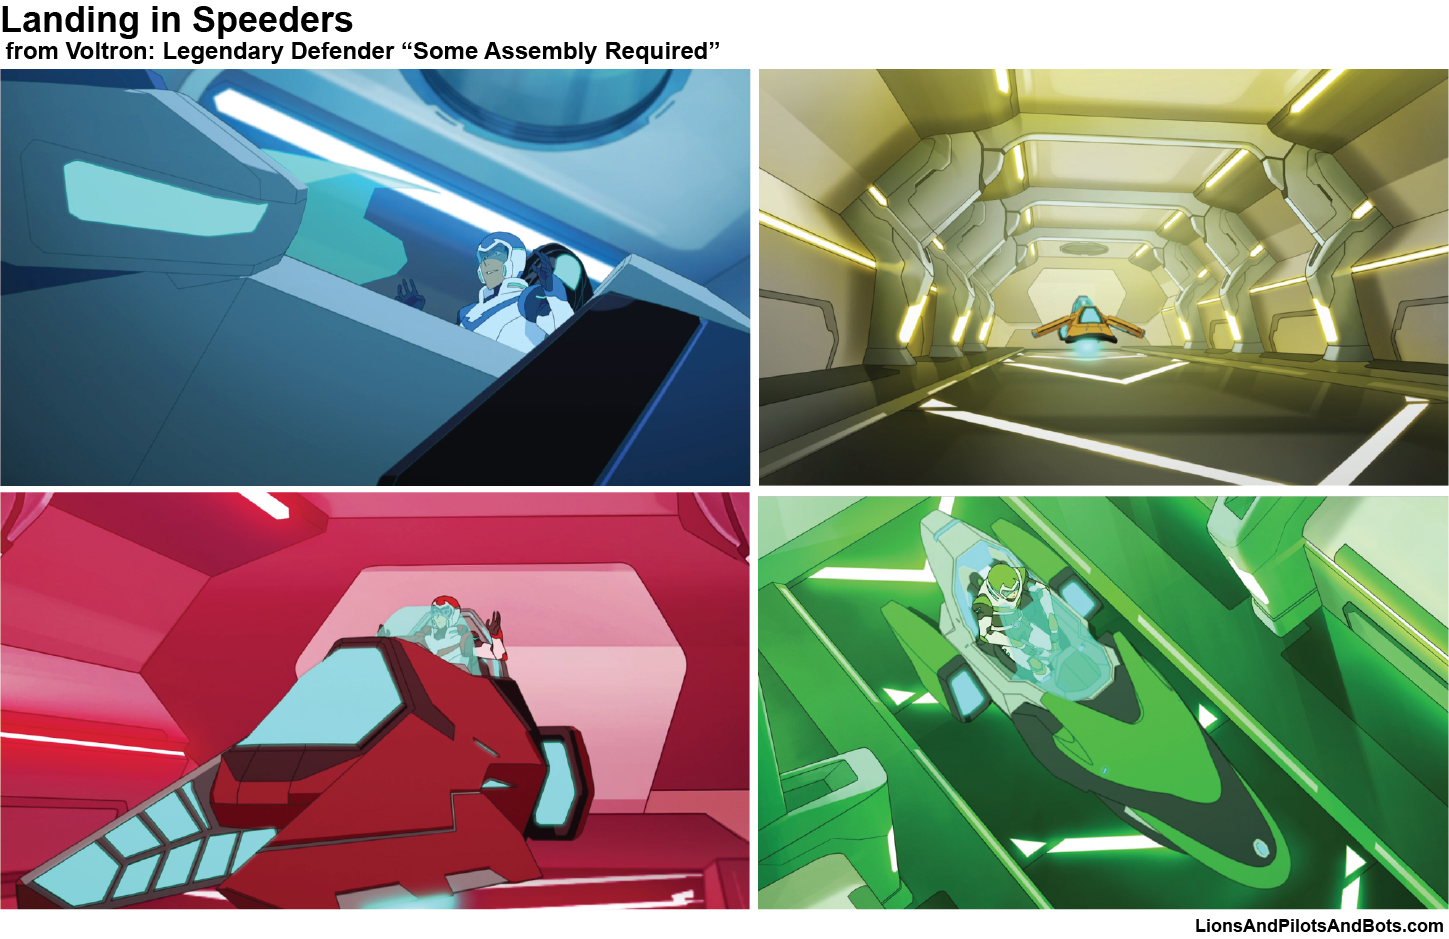
The speeder then travels in a seemingly horizontal, straight-line tunnel to a point directly beneath the Lion’s hangar.
The speeder then rides a platform that ascends until the speeder seemingly enters the sliding double-door hatch on the Lion’s chest.

In “The Ark of Taujeer,” during Keith’s dream sequence, we see the next step in a paladin’s journey to his or her Lion. The speeder stops rising once it reaches the platform on which the Lion rests, and it begins to move toward the Lion.
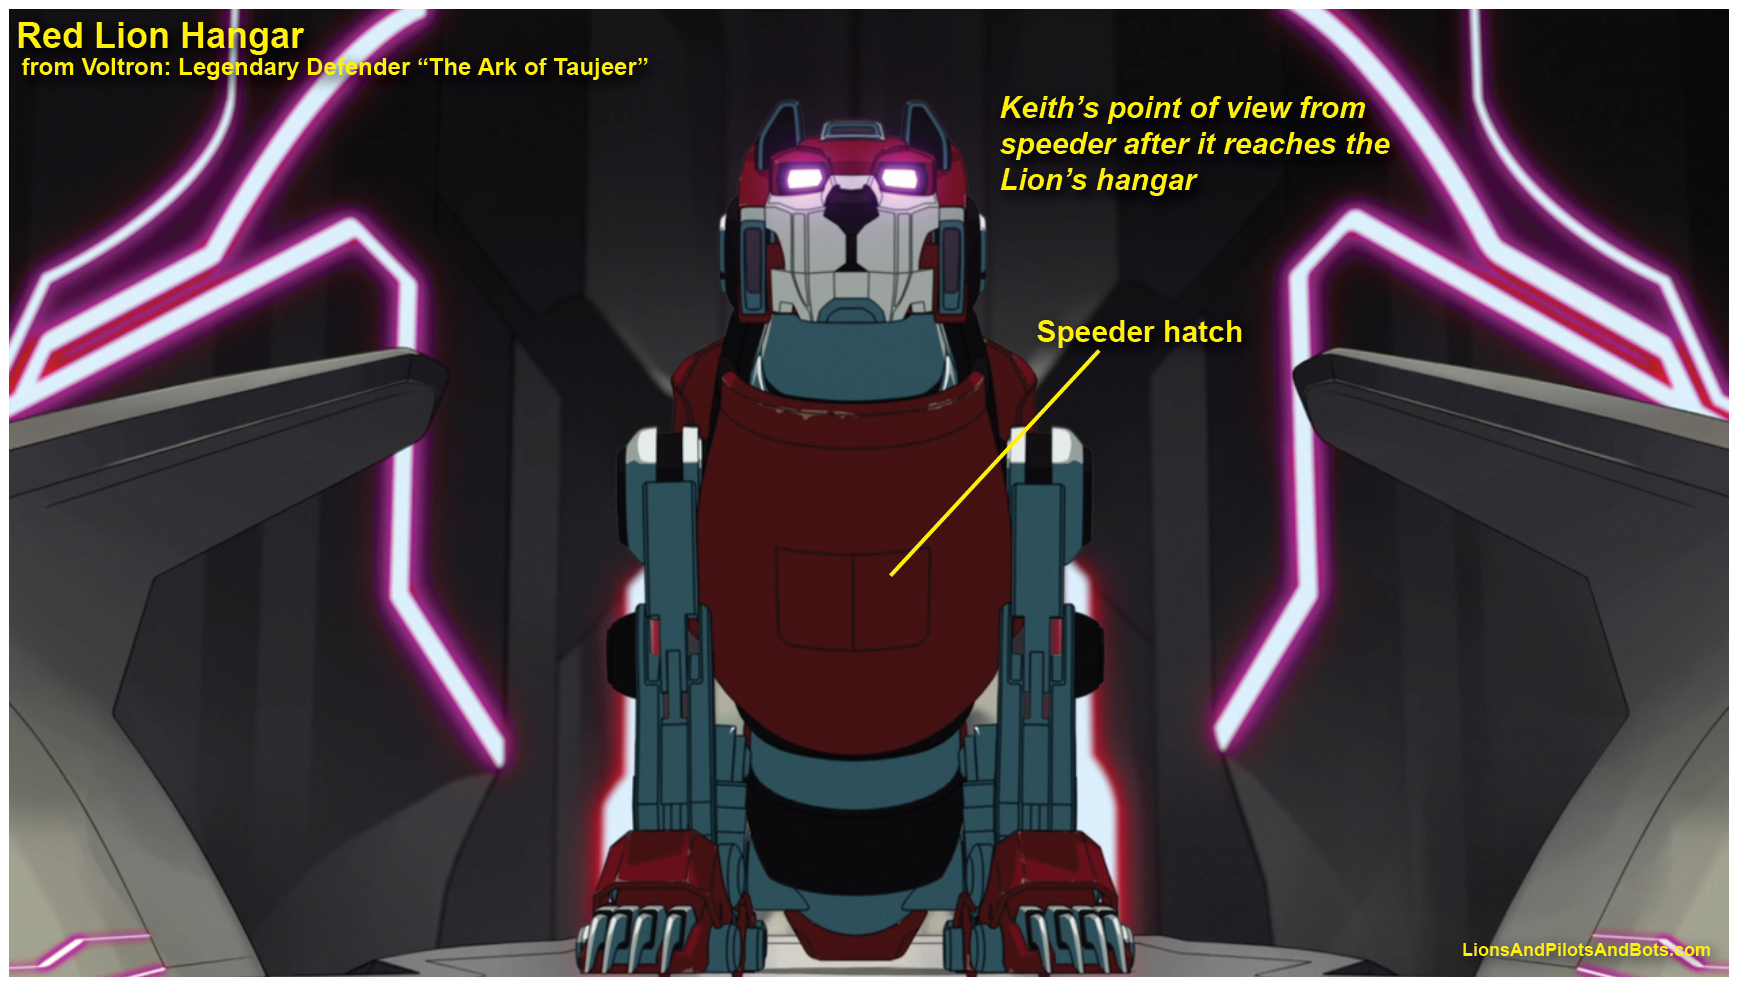
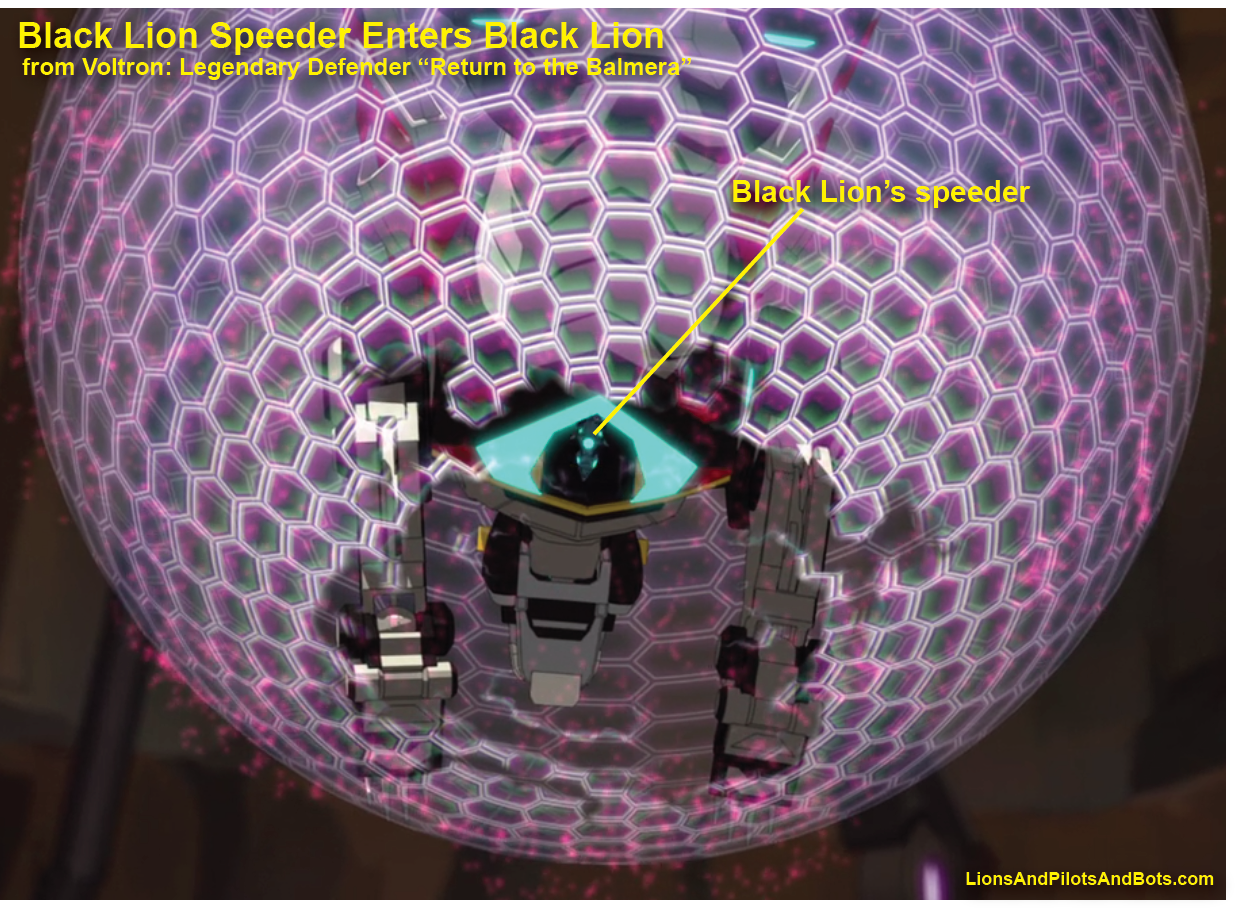
The speeder presumably enters the Lion through the double-door speeder hatch on the Lion’s chest, as we see happen in episodes such as “Return to the Balmera.”
For each paladin, the next thing we see is the paladin, seated in a chair, in a chamber behind the cockpit. A pair of sliding doors separates the chamber from the cockpit. The doors slide open, and the seated paladin moves forward and into the cockpit.
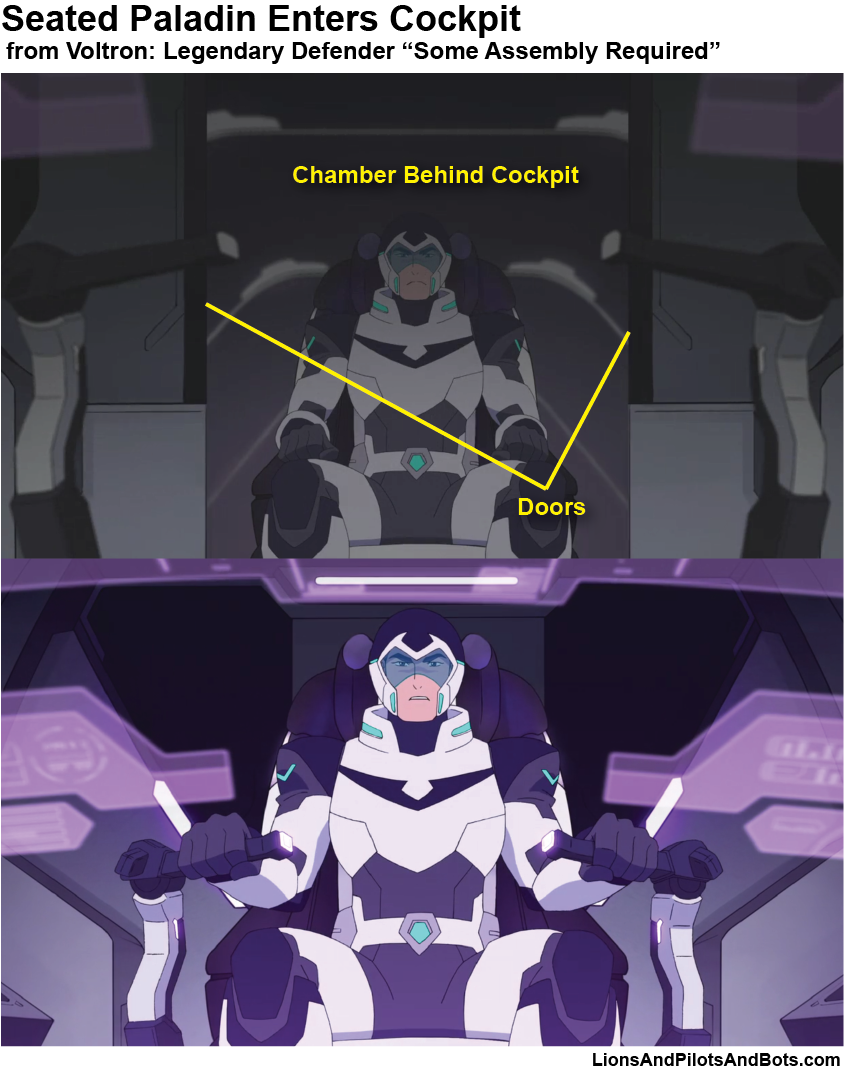
In “Some Assembly Required,” we can see that the Lion cockpit chair differs from the seat in the speeder.

This suggests that, after the speeder enters the Lion through the chest, the paladin exits the speeder and sits in a chair that raises into position behind the cockpit. (I point this out because, in Voltron: Defender of the Universe, the seat of the “speeder” actually became the Lion’s cockpit seat.)
Now that we’ve covered how the paladins access their Lions from the Castle of Lions’ bridge, let’s look at how the Lions exit the Castle.
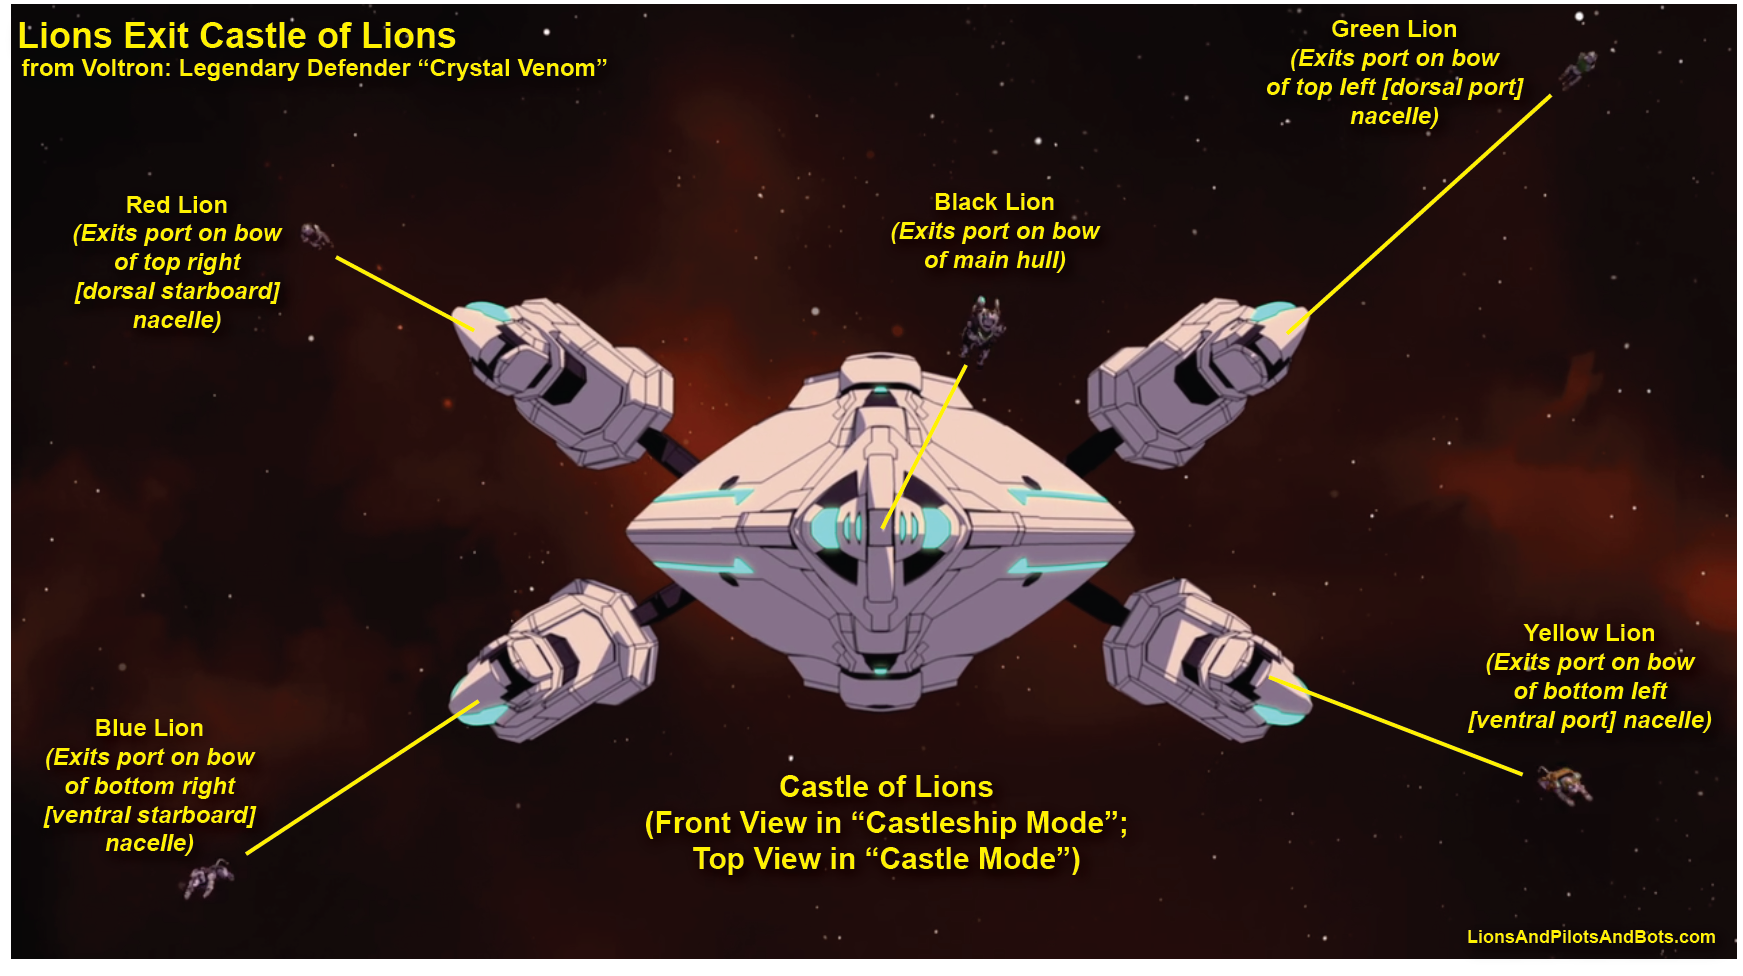
The three shots below, from “Crystal Venom,” “Return to the Balmera,” and “Taking Flight,” show which Lion exits which of the Castle’s exit ports.


The shot below, from “Taking Flight,” contradicts the shots from “Crystal Venom,” “Return to the Balmera,” and even the “Taking Flight” shot showing the launch of Blue Lion, so this shot probably has an easily made animation error.
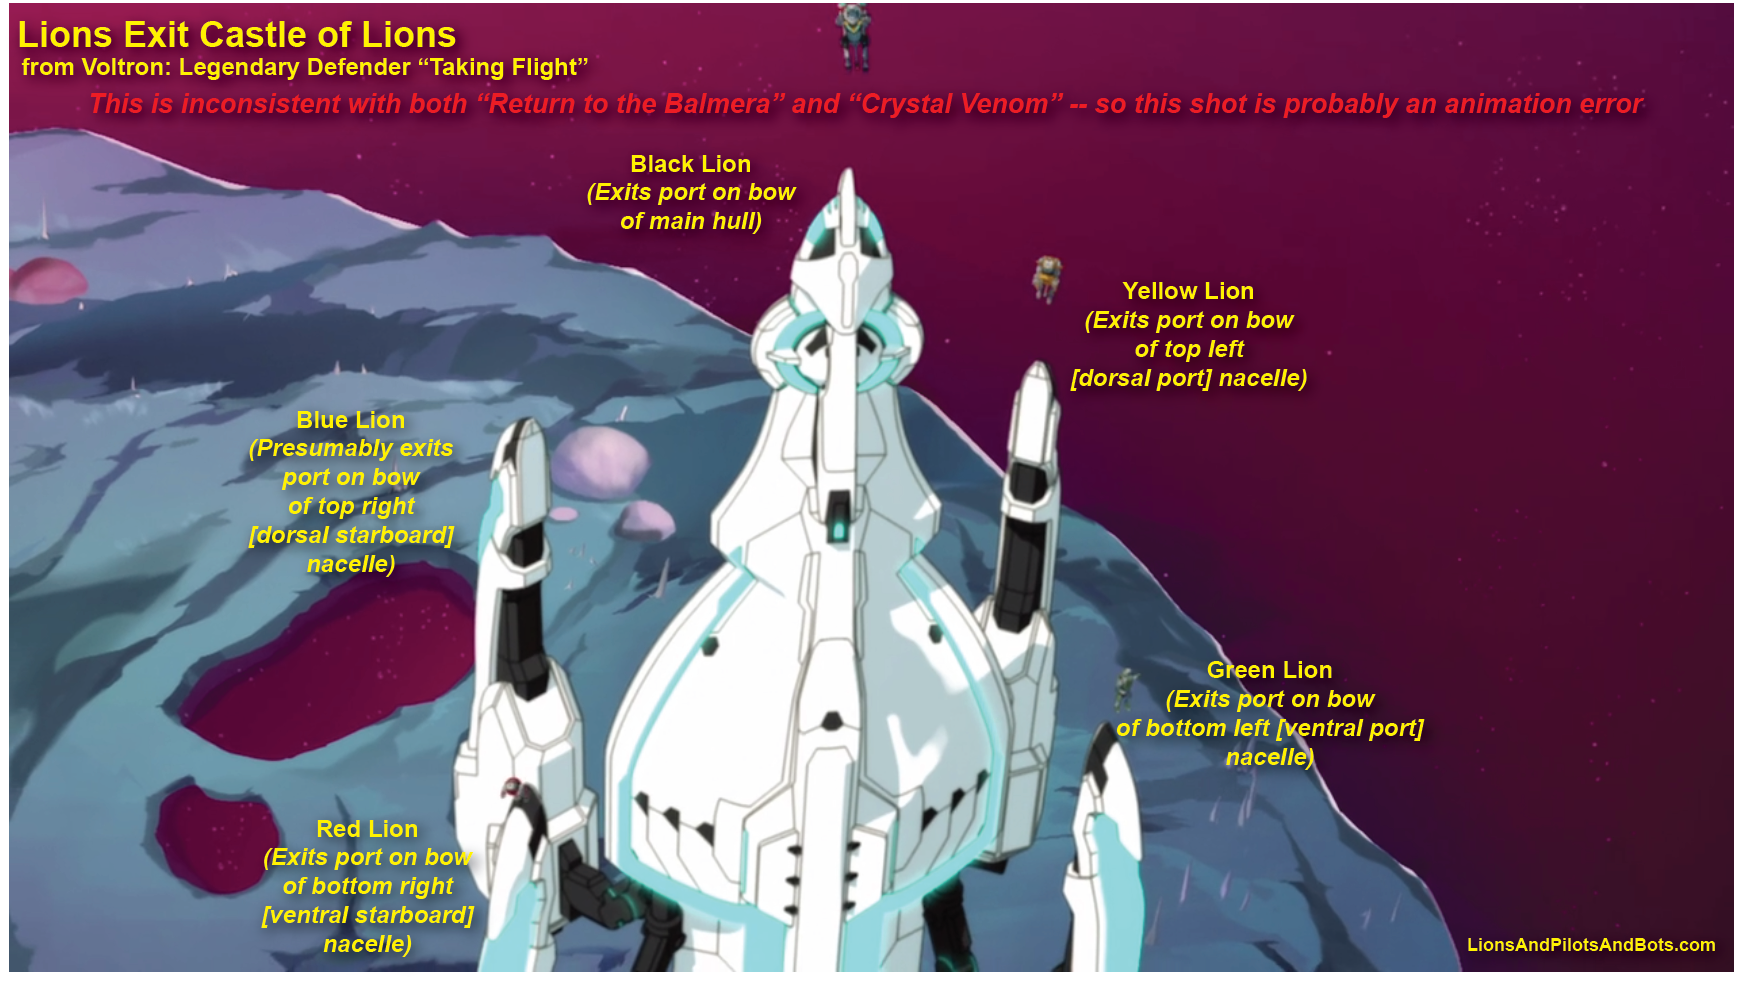
To summarize, assuming the erroneous shot from “Taking Flight” can be ignored:
- Black Lion exits the Castle through a port at the bow of the main hull
- Red Lion exits the Castle through a port at the bow of the top right (dorsal starboard) nacelle
- Green Lion exits the Castle through a port at the bow of the top left (dorsal port) nacelle
- Blue Lion exits the Castle through a port at the bow of the bottom right (ventral starboard) nacelle
- Yellow Lion exits the Castle through a port at the bow of the bottom left (ventral port) nacelle
Interestingly, the arrangement of the hangar exit ports is inconsistent with the arrangement of the exits on the bridge.
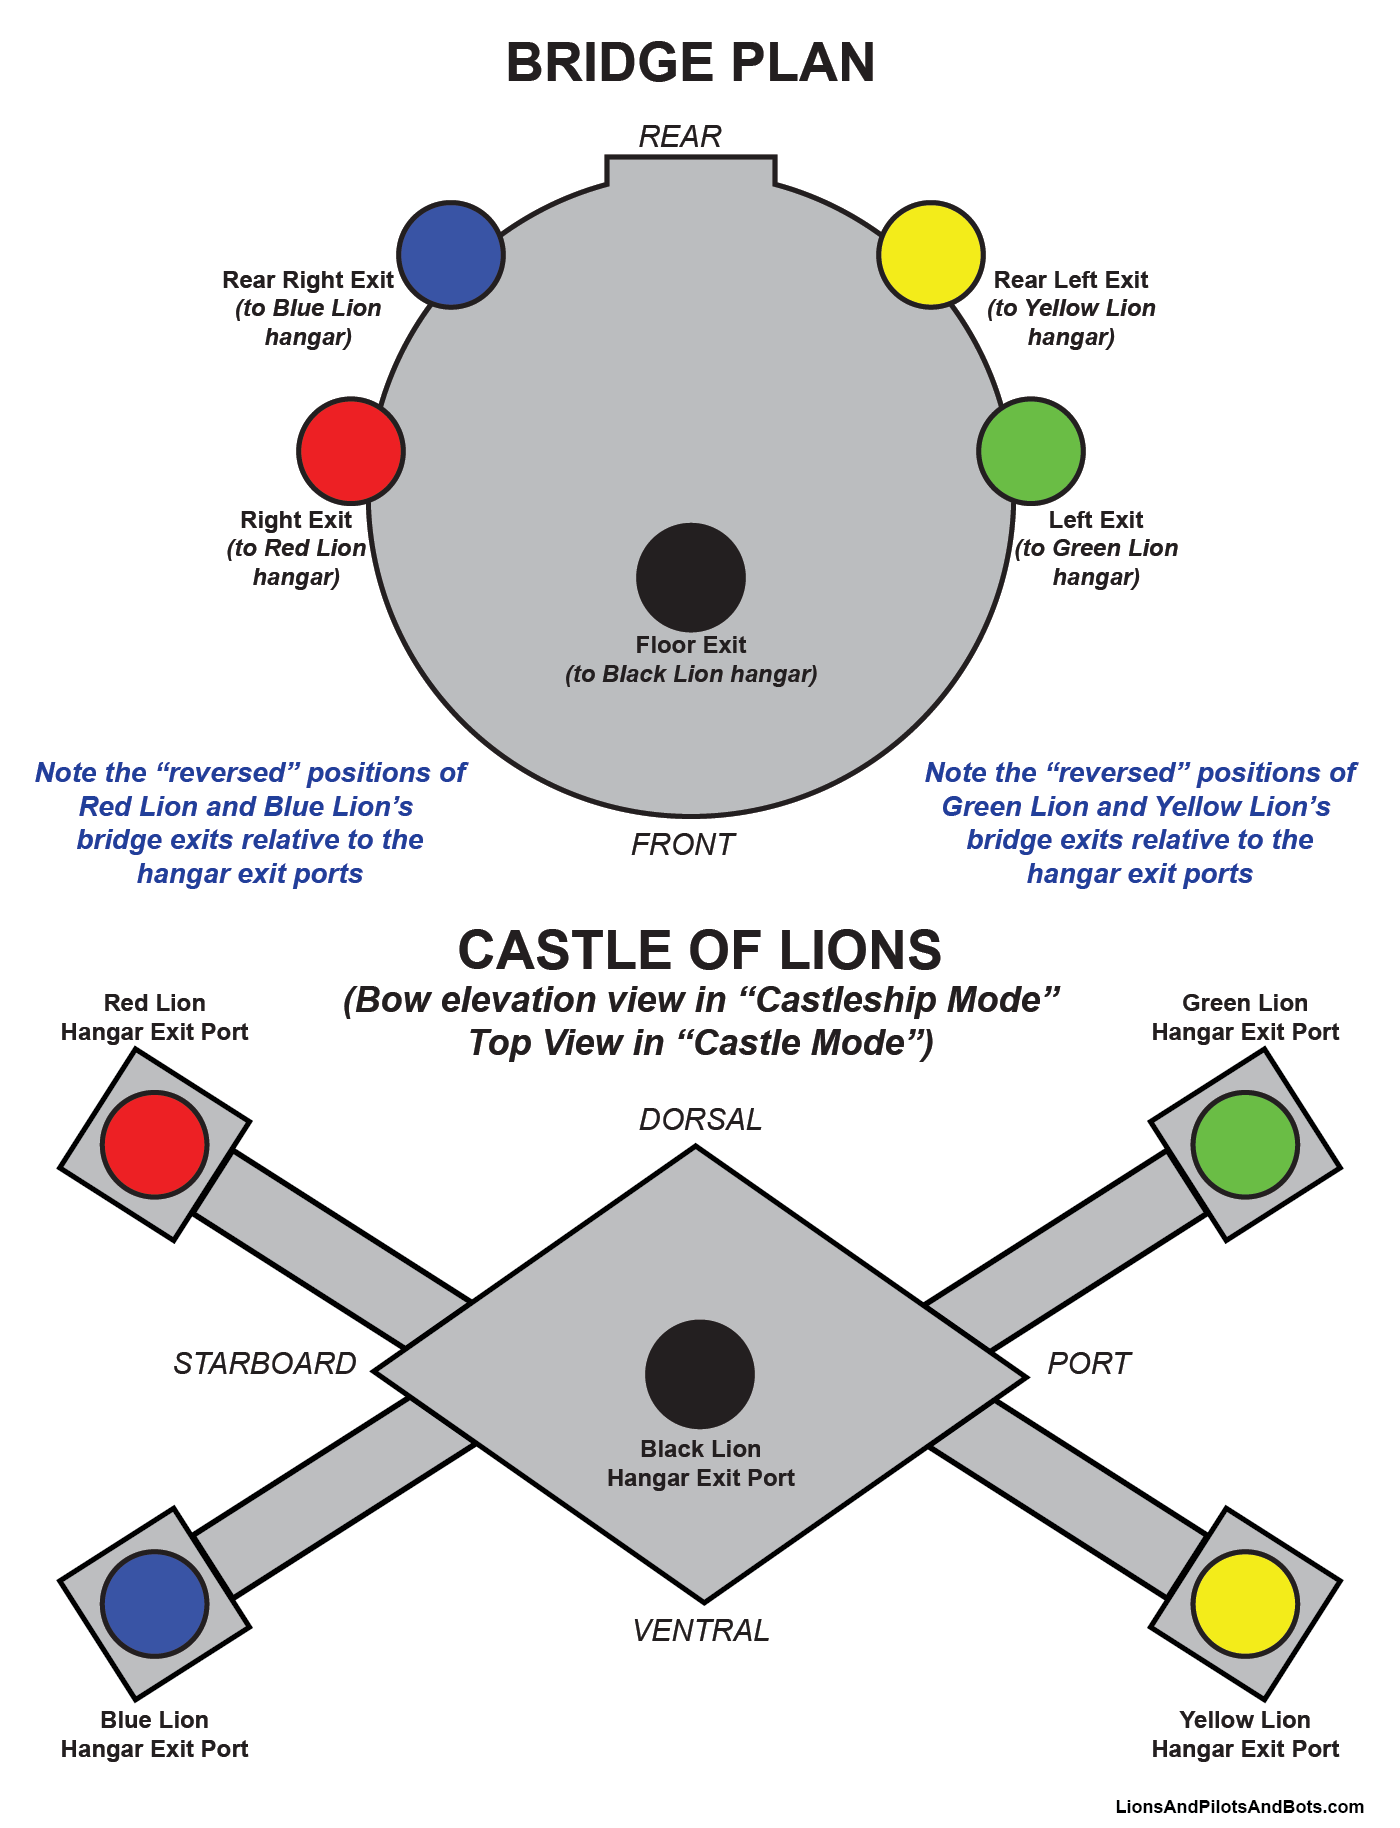
The paths of Keith and Lance, and the paths of Pidge and Hunk, would need to “criss-cross” so that each paladin can reach his or her Lion. This wouldn’t be a big deal, because Keith and Pidge’s paths could easily be “higher” or “lower” within the Castle than Lance and Hunk’s paths.
We’ve now walked through the path that each paladin follows from the bridge to the hangar of his or her Lion. Let’s take a quick look at the hangars.
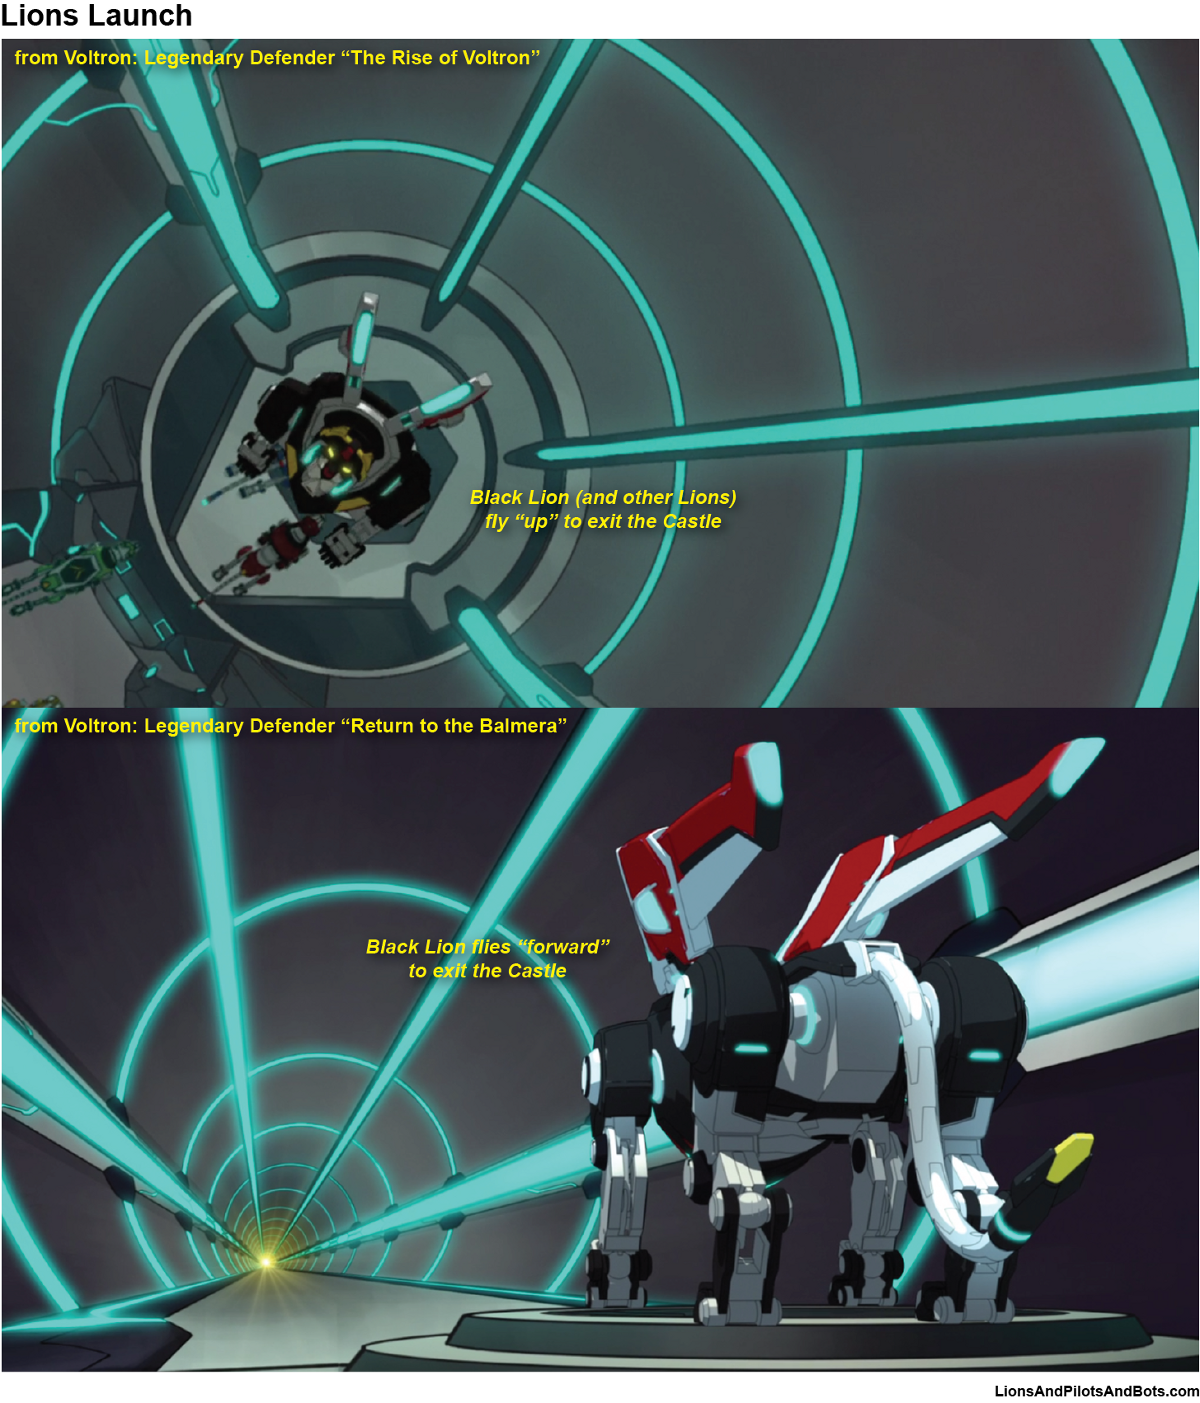
When the Castle of Lions is on the ground, in “Castle mode,” the hangars’ floors are aligned with the ground. In other words, for a Lion to launch out of the Castle, it flies up and out through an exit port in the “roof.”
When the Castle of Lions is flying and in “Castleship mode,” the hangars’ floors pivot ninety degrees so that when each Lion launches out of the Castle, it shoots forward and out through an exit port in the “front.”
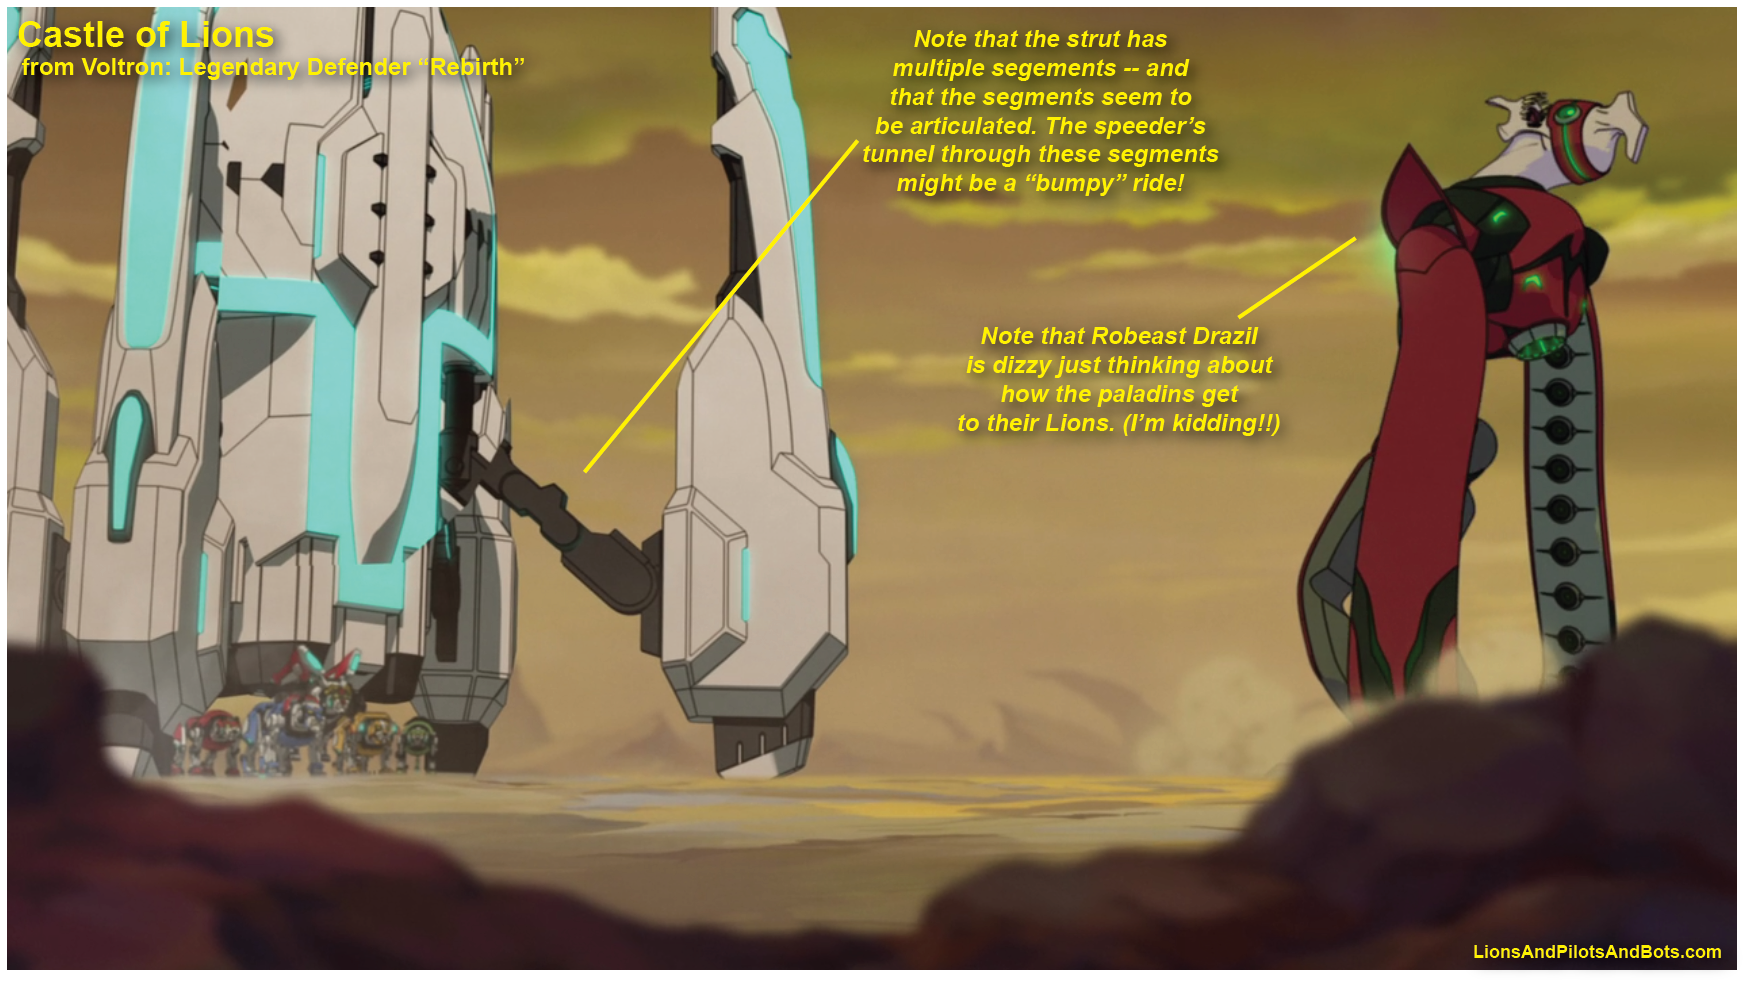
Finally, let’s look at the strut that connects each nacelle to the Castle’s main hull. As the shot below shows, the strut has multiple segments, and they appear to be articulated. A speeder traveling from the main hull to a nacelle might have a bumpy ride going through the strut! In all seriousness, I’d imagine the inside of a tunnel through the strut looking something like the inside of a jet bridge.
And… that’s it! The next time you visit the Castle of Lions, now you’ll know how to get to each Lion.